Topics covered in this Lesson:
| ||
Section View Drawing Techniques | ||
Putting your skills to use with Section Views.
In drafting there are a lot times where you want to give a lot of information, but not all of the views are helping to get your message across. Sometimes you just need to slice the object(s) down the middle and show what the guts look like. Using this method, you get a cross section of the part, or a "Section View".
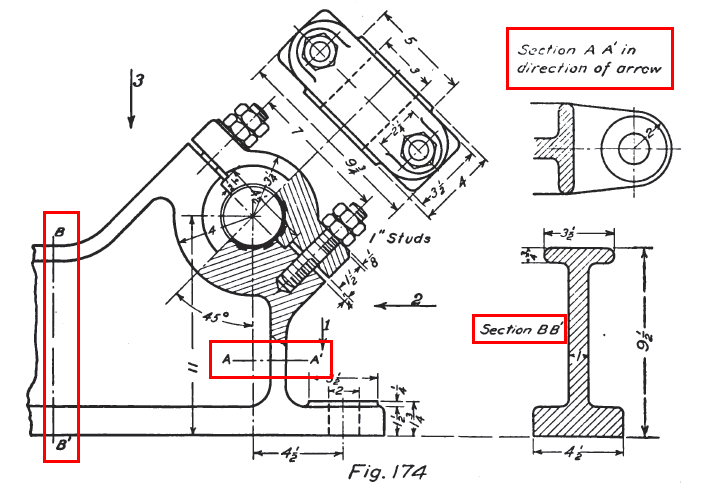
Take a look at the drawing above. You'll see a complex assembly drawing and two different section views. On the far left, you see the line that indicates where Section B-B is. On the right side, you see the section view. Does it make sense to you? What you are seeing is the cross section view of the metal beam part of the of the bracket. It's shown so that you can see what size the area is without having to look at the entire side view of the assembly. Section views are used for clarity.
Look for the indicators for Section A-A. Then look at the top right view. You'll see that the beam part is shown as well as the hole that is drilled through it.
Section views are used in Mechanical and Architechural drafting. Anytime you need to show some detail that isn't readily seen from an exterior view, "cut it up" and draw it.
Required knowledge before beginning
If you haven't already read through Tutorial 1-12 (Orthographic Projection), you should to get familiar with some of the concepts for this tutorial.
You should also jump ahead and read Tutorial 2-5 as it deals with Hatching, which is needed for Section views.
Looking at Section Views
If you understand Orthographic Projection and Hatching (you read the other two tutorials, right?) then you should be able to handle section views easily. Have a look at the image below and see if it all makes sense.
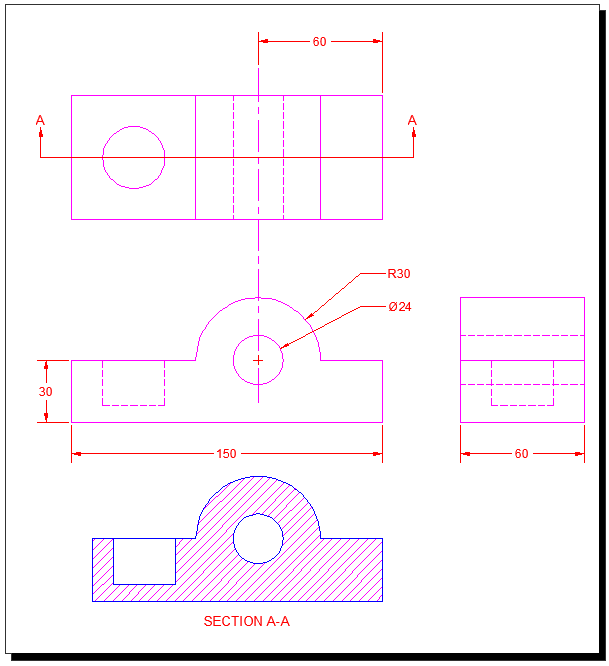
What you see is a very simple block with a hole drilled. This shows that the section view and the front view are almost the same. In fact, I just copied the Front view down to begin the section view. I changed some linetypes and then hatched it.
If you have more than one part in your view, you will need to make sure that it stands out. Here I have the same part as above, but with another piece placed inside it.
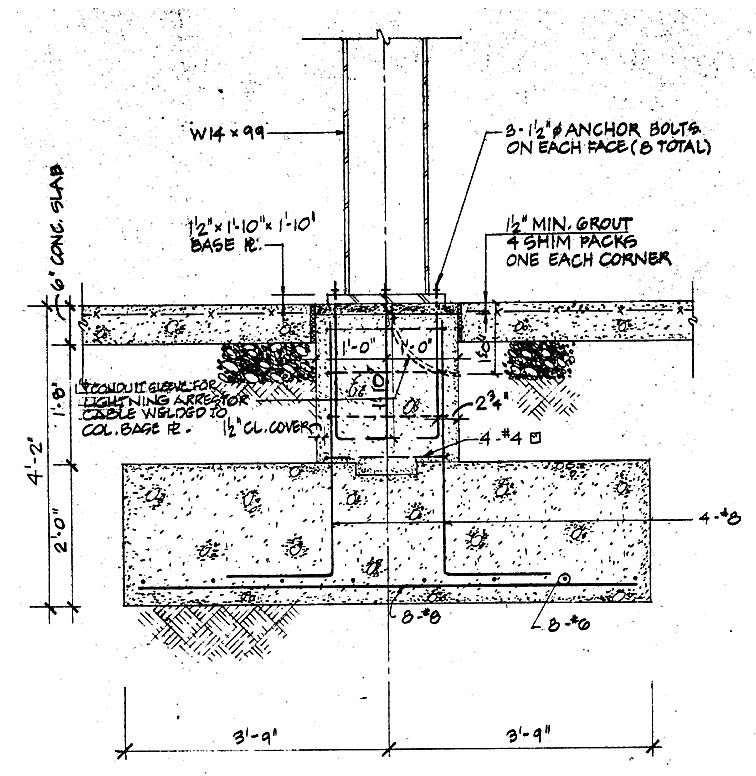
Here's an example of how a section view can be used in Architechural drafting. By using standard hatch patterns, someone else can look at the drawing and see that this shows a concrete foundation with earth on one side.
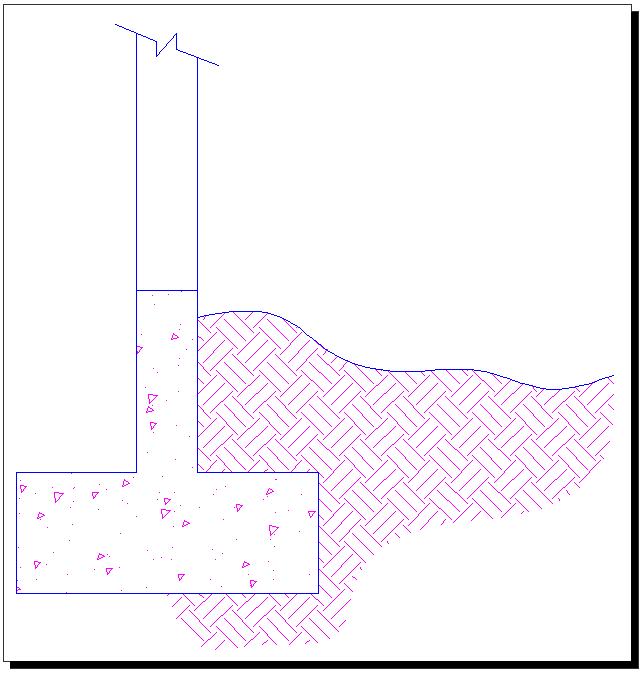
I think by now you're getting the idea of how section views and hatching help to tell the story of what you are drawing.
Drawing Section views in AutoCAD
For this exercise, we'll start with a simple drawing. Begin by drawing the part below, and as you're drawing, think about what the section view will look like. You do not need to draw the Isometric view, it is just for reference.
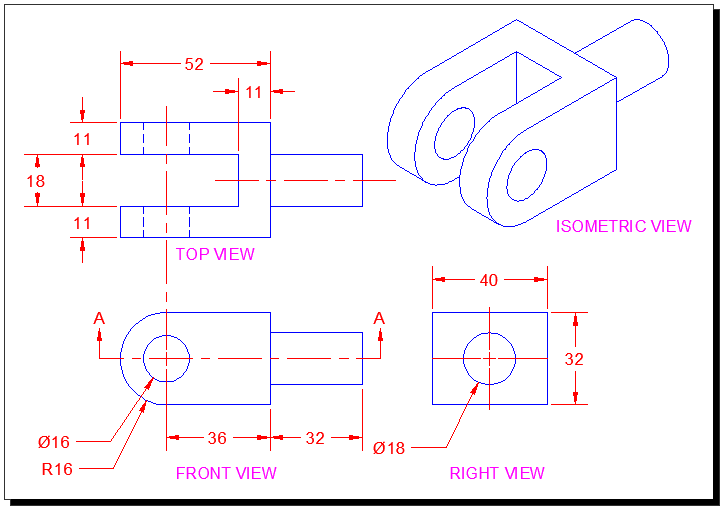
To draw the "Cutting Plane" that marks the section, draw a line and then use the leader command to make the arrows. Add text for the "A"s. Ok - what is your section view going to look like?
The Cutting Plane points up from the front view, It doesn't mean that it's pointing at the top view, but in this case it works. Also note the the Cutting Plane is in the middle. So if you chose the Top View, you're correct.
Copy the Top View. Straight up will work fine. You can keep the dimensions. It's a good idea to make sure that it is directly above the other view in case you have to stretch part of it. Then you can do both views at once.
What lines need to be changed? Do you still need hidden lines?
This is what your Section view should look like before hatching:
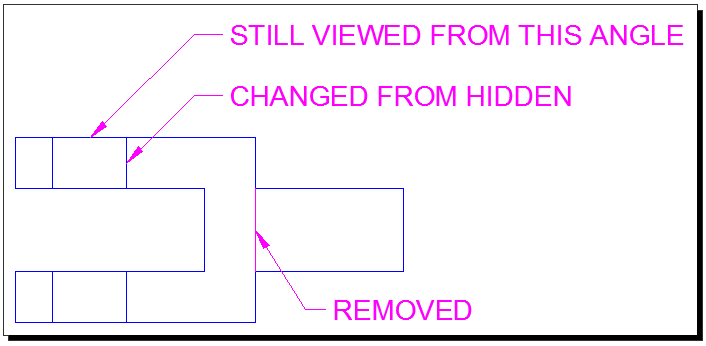
Is it still making sense? You needed to trim the line where the shaft on the right joins the part, because in the section view, this is solid. You needed to change the lines for the two holes from hidden to solid because they are not hidden any more. You should now be ready to add a Hatch patten to the view.
The Hatch command might be a little different depending upon the version that you are using. This example shows AutoCAD 2012.
Start the Hatch command and pick in the spots shown below. You want all three areas picked at the same time so that the hatch creates one object instead of three. This is needed so that you can edit the hatch and all the areas will look the same.

The areas picked will fill up with the last used hatch pattern and settings that were used. That's fine, we'll edit them now.

This is a big toobar / ribbon for this command. There are really only three items you need to be aware of to make it work:
If everything went well, the Section view you have should look like this:
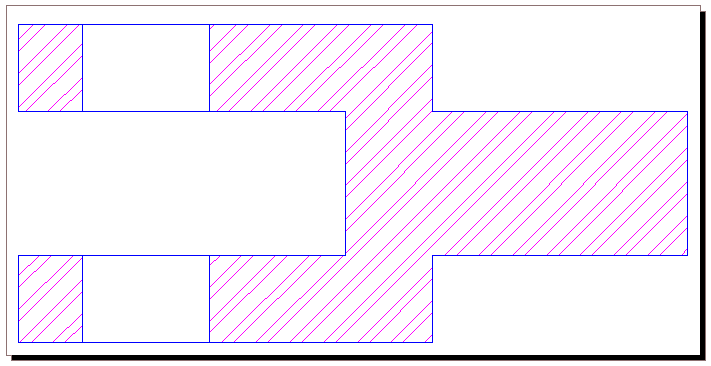
It's up to you if you want to put your hatch on a separate layer. It can help a lot as you get into more complex drawings. As you learn about printing through Layout Tabs, think about how having your Hatch can be useful on it's own layer - and maybe more than one layer.
Other uses for Section Views
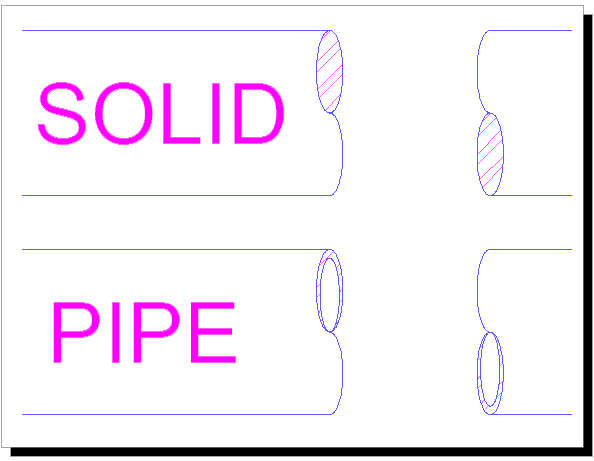
Here is a section view that is used to show a break in a solid bar and a pipe. This is a common way of showing long pipes that don't fit in your drawing, just add a break, but dimention the full length.
Here's an exercise for you: reproduce the image of a foundation below:
More exercises from Textbook of Machine Drawing
Conclusion
Section views are not usually very difficult to draw, because you should have a lot of the information first. You will draw your sections last and try to base them off of existing drawings first.
If you have the opportunity, look at drawing sets and see where they are used. If you are drawing something try out a section view, it's good practice for Hatching and also for developing your "CAD" eye.
Here's a video that shows helps explain the Section view drawing technique.
Review of Level 1: Everything in this Level will be used in your day to day CAD work. These are the basics that you will draw upon as you advance your skills. You have learned the how the coordinate system works and how to enter points so that AutoCAD knows where you want your objects to be. You were shown the most common drawing and modifying commands. You learned techniques for snapping to objects, other ways to input information and how to move around a drawing. For a new user, I cannot stress enough how mastering this level will make you a good drafter. It all comes down to accurate and fast input.
|
Source From:www.mycadsite.com

No comments:
Post a Comment