Topics covered in this Lesson:
| ||||||||||||||||||||||||||||
Rotate, Fillet, Chamfer, Array | ||||||||||||||||||||||||||||
Now it's time to learn a few more commands. Like all of the commands learnt so far, these too will be ones that you will use regularly.
Here are the commands that you will be learning in this lesson.
Once again you will recreate a drawing. This one is called Assignment #5.
Click here to see the GIF format file. Click here for the DWG file. Follow the steps shown carefully. As these commands require a little more input, make sure that you keep an eye on the command line. You will be asked to provide information throughout the commands.
Start up AutoCAD and load the acad.dwt template like you have for the other lessons.
Start by drawing a horizontal 10" X 7" border with the bottom left corner at 0,0
Draw
You are now going to rotate this rectangle 90° clockwise.
Start the ROTATE command. AutoCAD asks you to select objects. Select all parts of the rectangle and press <ENTER>. Now you must indicate a 'base point'. Think of this as a pivot point around which the rectangle will rotate. In this example, you want to select the bottom right corner (remember to use your Osnap). Once you've selected the base point, the command line shows rotation angle or [Reference]: This means that 'Rotation angle' is the default, so type in the angle you want to rotate the object. Think about how AutoCAD measures angles. Looking at your rectangle and the one on the assignment sheet, you'll see that you want to rotate the rectangle clockwise or: -90 degrees. Enter that number and press <ENTER>.
Command: RO <ENTER> Current positive angle in UCS: ANGDIR=counterclockwise ANGBASE=0 Select objects: <Select the Rectangle> 1 found Select objects:<ENTER> Specify base point: <PICK BOTTOM RIGHT CORNER OF THE RECTANGLE> Specify rotation angle or [Reference]:-90 <ENTER>
The rectangle is now been rotated -90 degrees from its original position. Picking different base points will give you different results.Undo the last command. Try a few different combinations of base points and angles to see what results you get. When you are done practicing, get the rectangle back to the position that it needs to be in.
Make a COPY of the rectangle 2" above the first one (remember your relative coordinates).
Now you're going to modify the second rectangle so that it has rounded corners. Start the FILLET command. Look at the command line. It will look something like this:
Command: F <ENTER> FILLET
Current settings: Mode = TRIM, Radius = 0.0000 Select first object or [Undo/Polyline/Radius/Trim/Multiple]:
AutoCAD first shows you what the current fillet radius is (0.0000). This will be the last value that was used. Once it's changed, it will keep the new value in memory. The next line shows you what options you have in this command. Remember that the Capitol of each option selects that particular option. What you want to do is change the fillet radius to 3/8" (or .375). To do this you have to type R<ENTER>. When you type this, AutoCAD will give you the chance to enter a new fillet radius. At this point enter .375 and press<ENTER>.
The fillet radius is now .375 (which is what you want). The default option is Select first object. Select the left side of the top rectangle (yes, the whole rectangle will highlight if you drew it as a rectangle). AutoCAD now asks you to select second object. Select the top line and AutoCAD will make a smooth round corner with a radius of .375. AutoCAD automatically ends the command at this point.
Restart the FILLET command
Copy the first rectangle to a point 4-1/2" above. Now you will use the chamfer command to give this rectangle sharp, angled corners.
Start the CHAMFER command.
This is very similar to the fillet command. You have several options available. Want you want is an even 45 degree angle 3/8" in from the corner. Like the fillet command, you first have to tell AutoCAD what distance you want. To do this, type D to select the Distance option. The command line now looks like this:
Specify first chamfer distance <0.5000>:.375<ENTER> as your first distance.) The command line now asks for the second distance. AutoCAD will automatically change the default of the second distance to match the distance you entered for the first.
Specify second chamfer distance <0.3750>:<ENTER>
You will then be asked to Select first line. The chamfer command works just like the fillet command. Select the line on the left of the top rectangle. (Don't worry if the entire rectangle highlights.) When prompted to Select second line: select the top line. You will now have a perfect sharp corner at a 45 degree angle 3/8" in from the corner. Do this to the rest of the corners.
Look at the command line. It should look like this:
Command: CHA <ENTER> CHAMFER
(TRIM mode) Current chamfer Dist1 = 0.0000, Dist2 = 0.0000 Select first line or [Polyline/Distance/Angle/Trim/Method]: D <ENTER> Specify first chamfer distance <0.5000>: .375 <ENTER> <0.3750>:<ENTER> Select first line or [Undo/Polyline/Distance/Angle/Trim/mEthod/Multiple]: <select one side of the rectangle>
Now look at the assignment sheet and notice the group of six rectangles on the bottom right. You could draw each one individually, but AutoCAD has a command that will allow you to draw one, and it will make the others.
Draw a rectangle that is 1/2 unit square with the bottom left corner at 6,1.5 (absolute points).
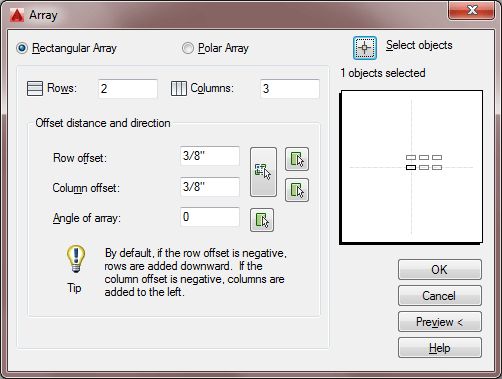
Start the ARRAY command. If you are using AutoCAD 2010, look at the dialog box shown below (if you are using AutoCAD 2012 or newer, please check these videos for the updated command):
Also, in newer versions you might see a command line prompt:
Command: AR ARRAY
Select objects: <SELECT THE RECTANGLE> 1 found Select objects: <ENTER> Enter array type [Rectangular/PAth/POlar] <Rectangular>: <ENTER> Type = Rectangular Associative = Yes Select grip to edit array or [ASsociative/Base point/COUnt/Spacing/COLumns/Rows/Levels/eXit]<eXit>: COL Enter the number of columns or [Expression] <4>: 3 Specify the distance between columns or [Total/Expression] <0.7500>: .75 Select grip to edit array or [ASsociative/Base point/COUnt/Spacing/COLumns/Rows/Levels/eXit]<eXit>: R Enter the number of rows or [Expression] <3>: 2 Specify the distance between rows or [Total/Expression] <0.7500>: .75
Specify the incrementing elevation between rows or [Expresson] <0.0000>: <ENTER>
Select grip to edit array or [ASsociative/Base point/COUnt/Spacing/COLumns/Rows/Levels/eXit]<eXit>: <ENTER>
As you can see, it's a lot to enter, but this command can be a real time saver if you have lots of objects in your array.

When confronting a new dialog box, I recommend that you look for what is needed from the TOP DOWN to the bottom. This is a great example.
If the array is correct (check the sample drawing), press right click. If you need to change anything, press the ESC button, make your changes in the dialog box and preview again.
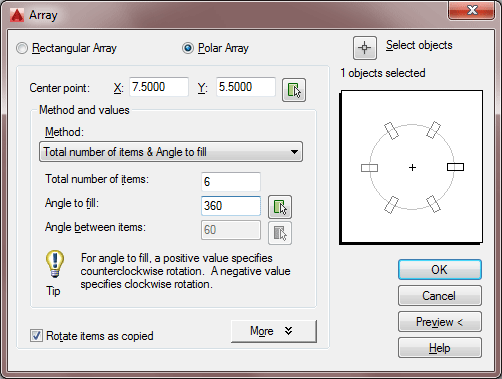
Now you are going to use the ARRAY (polar) command to create the shape in the top right corner of the assignment.
Start by making a CIRCLE with a center point of 7.5,5.5 and a diameter of 1.5 Next make a LINE from the center of the circle going 1" to the right (remember your relative input and Osnaps).
Start the ARRAY command. When asked to select objects, pick the line you just drew.

Examine the dialog box above. Remember to start from the TOP. In this case, you have to select your objects and select a Center Point for the array. (Select the center of the circle.)
NOTE: Sometimes the Array command can be quicker than the offset command. Think of creating lines for a ceiling grid. You 'could' offset 30 lines one at a time, or you 'should' use the array command to create all 30 lines at once.
Save and print your drawing.
So far in seven lessons, you have learned many of the common commands in AutoCAD. It may not seem like a lot, but the idea is to become fluent in them. It should be second nature to run these commands, as these are the ones you will be using most often. With practice, you won't need the command line to help you along. Think of the first time you drove a car with a manual transmission. After time, it got smoother, didn't it. I can't stress enough how important practice is during these early lessons.
Extra Practice: Copy this drawing - extra_009.gif
Extra Practice: Copy this drawing - extra_010.gif
Extra Practice: Copy this drawing using 2 methods. First create the lines using the Offset command, then create the lines using the Array command. Compare which method should be easier, and when you might use one over the other - extra_012.gif
Source From:www.mycadsite.com
| ||||||||||||||||||||||||||||
Thursday, February 5, 2015
LESSON 1-7 ASSIGNMENT 5 MODIFYING COMMANDS
Subscribe to:
Post Comments (Atom)
Followers
yt

Follow The Author
Designed By Templateism | Seo Blogger Templates

No comments:
Post a Comment